Thursday, December 22, 2011

Merry The Night

Hello everyone! How is everyone dealing with holiday madness? I like to dedicate one day out of the holiday season to do all my in-store shopping. Other than that, I'm all about the online shopping! Unfortunately, I pulled my neck for the second time this month and I have been too busy to nurse it back to health. Anyone willing to trade unlimited chiropractic care for some yummy desserts, please contact me. Just kidding! Maybe...

My most recent networking opportunity (I prefer it over the term "gig" seeing as I'm not in a high school garage band that plays at house parties) consisted of making dessert trays. With the help of my friend Melissa, I set up a meeting with her parents and together we came up with four different items and a "vision" for the trays. The items that made the cut were: caramels, shortbread cookies, coconut macaroons and vanilla bean marshmallows. You see, Melissa's Dad is a doctor and he wanted to bring his fellow colleagues some edible holiday cheer! That's my cue!

Melissa and I arrived to the hospital on Wednesday night and we were given a special tour! I felt like I was on Cribs: Hospital Edition. We delivered all the trays to their appropriate locations and each shift had their own so hopefully, no one was left out!

Here is a picture of Dr. De Carvalho with one of the trays!


I received word that everything was a hit and I am grateful to have had an opportunity like this! I truly enjoyed every minute of it and I hope that these bite-sized treats gave the hardworking staff a few well-deserved moments of yummy and joy!

Wednesday, December 7, 2011

My French Love

I figured it was high time for me to start sharing which restaurants I frequent around San Diego! One of my favorite breakfast spots is nestled on the corner of 9th and G Street in Downtown. Café Chloe is a charming French restaurant/wine bar and while its patrons tend to pack in mainly for breakfast/brunch, they also have amazing options for dinner. They even have an afternoon tea! I have been impressed with every item I have ordered. It's always refreshing when the owners are present and helping out their employees. Their rich, flavorful dishes and pleasant staff are what makes Café Chloe my go-to breakfast spot, time and time again.

Some of the items I have tried...

Bloody Mary
Orange Mimosa


Croque Madame


Soup Du Jour


Mussels with Pommes Frites


Mayan Mocha with Vanilla Bean Whipped Cream


Affogato


Bon Appétit!

Sunday, December 4, 2011

Commence Holiday Weight 2011!

It has been brought to my attention by numerous individuals that I haven't been posting on my blog! I can't believe I let 3 weeks pass by without a single post! I apologize for being E.I.A. (Eating In Action). Actually, a lot has been going on. Between Thanksgiving madness, my birth-week (that lasted 2 weeks), trying new eateries, creating a special holiday card and prepping for a job that I have coming up, the time totally flew by! I also have a pulled neck muscle and can't turn my head to the right. Driving has turned into an act of congress. This experience has shown me how much I take my neck for granted!

This Thanksgiving, I made quite a few items but my favorite were the Cheddar-Parsley Biscuits and Apple-Cranberry Pie. It isn't Thanksgiving without it! I've been baking up so much stuff recently, that it would put the Keebler Elf to shame. Unfortunately, I don't always have the time to have a proper foodoshoot. Slowly but surely, new pictures will make their way up!

Friday, the 25th, was my birthday! I spent the morning hitting up the Black Friday sales and treating myself to a $4+ Gingerbread Latte from Starbucks. On Saturday the 26th, I made my way to Valley View Casino for their lobster buffet. Definitely worth visiting especially since your first visit is FREE! That's right! You heard it here first: FREE! They have a ton of fresh seafood: mussels, lobster, shrimp, etc. Also, the cutest desserts I have ever seen! Everything is miniature, which I love: tarts, French macaroons, cheesecake lollipops, ice cream bars dipped in chocolate, truffles and tons of other goodies! They also make their own ice cream and they have an ice cream bar set up so I asked for a cone to go filled with Vanilla Bean Ice Cream and Mango Sorbet. Whenever I visit a buffet, I have a set of golden rules for myself. That being said, I think it's time to pass the torch.

1) Don't load up on fillers (i.e. bread).
2) Only order water to save room for food. Let's be honest, you didn't stand in that long line to fill up on soda.
3) Go for the good quality stuff like seafood and meats, first.
4) On the first round: taste everything, eat nothing. Too early to commit to a dish.
5) If you are with another person, assuming it's not a first date, visit each station together. Each of you fill your own plate and use a third "communal" plate and load it with items you both would enjoy trying. One person holds the third plate and the other serves.

And lastly...

6) Take your time! It's not like they're going to run out of food.

For this post, I would like to share the recipe for the Cheddar-Parsley Biscuits I made for Thanksgiving. They are super easy to make and they taste just like the biscuits from Red Lobster! I found the recipe on BigOven.

Cheddar-Parsley Biscuits


Ingredients

2 1/2 cups Bisquick baking mix
1 cup sharp cheddar cheese, shredded
3/4 cup whole milk
2 tbsp butter, melted
1/8 tsp garlic powder

1/4 cup butter, melted
1/2 tsp garlic powder
1/2 tsp dried parsley flakes

Directions

Preheat your oven to 400 degrees - conventional.
Line a half sheet pan with parchment paper.

In a medium bowl, combine Bisquick with cheddar cheese, milk, 2 tbsp of butter and 1/8 tsp garlic powder.
Once completely combined, drop large spoonfuls of the dough onto prepared baking sheet.

Combine 1/4 cup butter (melted) with 1/2 tsp garlic powder and parsley flakes.
Brush this mixture over the tops of each unbaked biscuit.

Bake for 14 to 16 minutes or until the tops of the biscuits begin to turn light brown.
Serve warm.

These biscuits are also great the next day for making miniature sandwiches! A slice of good quality deli meat, a slice of tomato and some spicy mustard and you have yourself a delicious snack! Enjoy!

Sunday, November 13, 2011

Penguins and Peanut Butter Cups

Hello everyone! How is everyone handling the time change? I don't know how the penguins do it, dealing with complete darkness 6 months out of the year. Did you know that at Sea World, they turn the lights off in the penguin encounter for 6 months since that's what the penguins are used to? A little nugget of trivia that I learned from my Astronomy professor.

I made my way over to my friend Jen's house the other day. I don't like showing up empty handed so I quickly hit the pantry to see what ingredients I had to work with. I quickly noticed that I had bags of chocolate chips that had yet to be used. Those little guys were meant to be used in something other than cookies and I was going to help them reach their fullest potential! For Halloween I bought a bag of Reese's candies and it contained white chocolate peanut butter cups. Since I gave all of my candy away before trying one, I decided now was a great time to make some from scratch!

Since I've never dabbled in the world of peanut butter cups before, I turned to the internet for ideas. The best recipe I came across was on Brown Eyed Baker, but I decided to make some changes to it to really make it perfect!

Peanut Butter Cups


Yield
About 42 cups

Ingredients

1/2 cup creamy peanut butter
2 tbsp unsalted butter
2 tbsp light brown sugar
8 tbsp powdered sugar 
(3) 11 oz bags of good quality chocolate chips (milk, white or dark)
3 tbsp of vegetable oil

Directions

Line a mini-muffin pan with paper liners; set aside. Line a baking sheet with wax or parchment paper; set aside.

For the Peanut Butter Mixture

In a medium saucepan, combine the peanut butter, butter and brown sugar over medium heat. Heat until completely melted, stirring constantly. Remove from the heat. Add the powdered sugar, in two parts, stirring until completely combined with the peanut butter mixture after each addition. Set aside.

For the Chocolate Mixture

Using the double boiler method, fill a heatproof bowl with the chocolate chips and set over a pot of simmering water, stirring constantly with a heatproof spatula. You don't have to melt all the chocolate chips at once; can be done in sections. The chocolate must be extremely smooth and somewhat runny.*

*A good way to test this is by scooping up some chocolate with the spatula and allowing it to stream into the bowl. If the chocolate is too thick, it will stick to your spatula and will not stream in a fluid motion. If this is the case, add in the 2 tbsp of vegetable oil and incorporate completely. If it is still too thick, which I noticed was the case with the white chocolate, add in more vegetable oil, a tsp at a time, until you have reached the desired consistency. With the milk chocolate chips, I didn't have to use any oil.

Scoop a spoonful of chocolate into the bottom of each muffin cup (about 1/3 full) and give the pan a few firm taps on the counter to even out the chocolate.

Using a tsp, scoop out the peanut butter mixture. Roll it into a ball and flatten it into a disk (I used a bottle cap to flatten them out evenly). Place disks on the prepared baking sheet lined with paper. Once finished with all of the peanut butter mixture, refrigerate the muffin pans and the peanut butter disks for about 15 minutes.

Once chocolate is firm, place a peanut butter disk on top of each chocolate-lined muffin pan. Use a spoon to add melted chocolate* on top and around each peanut butter disk until completely covered. Tap the pan again so that the chocolate fills all the empty spaces and remains even on the surface. If necessary, add a little more chocolate and tap again. If you see any air bubbles on the surface, poke them gently with a toothpick and tap the muffin pan again.

*If the chocolate is firming up, return bowl to the pot of simmering water for about a minute until chocolate is completely melted and smooth.

Refrigerate finished peanut butter cups again for about 20 minutes, until completely firm. Remove the peanut butter cups from the pan and store in an air-tight container or in the refrigerator. You can even freeze them!


You'll go nuts for these cups!

Monday, October 31, 2011

Happy Halloween!

Happy Halloween everyone! Wow, what a drag to have Halloween on a Monday! I was asked by several people if I was going to dress up, but I wasn't going to dress up just to bake at home. That could be a fire hazard! Last year, I made a cupcake costume and I had polyfill in places I never knew existed! Speaking of costumes, I received a call from my sister saying that she was going to wear a name tag with "Margarita" on it and she was going to stand on a rock. Get it? Margarita on the rocks. My sister, ladies and gentlemen!

It was Bakingpalooza at my house this weekend! I was asked by my Mom's friend to create a dessert table for about 40 people for a Birthday/Halloween party she was having the day before Halloween. I went over to her house to check out the table that I would be working with and it was ideal for a Halloween party! It looked like it belonged in a haunted mansion along with a creepy wonky-eyed butler that goes around asking people, "Would you like a drink?". It reminded me of that Saved by the Bell episode where "the gang" wins a weekend trip to the murder mystery house. Point of the story: the table was AWESOME! 

All the items on the menu were (appropriately) given Halloween names. Here's a picture of the menu!


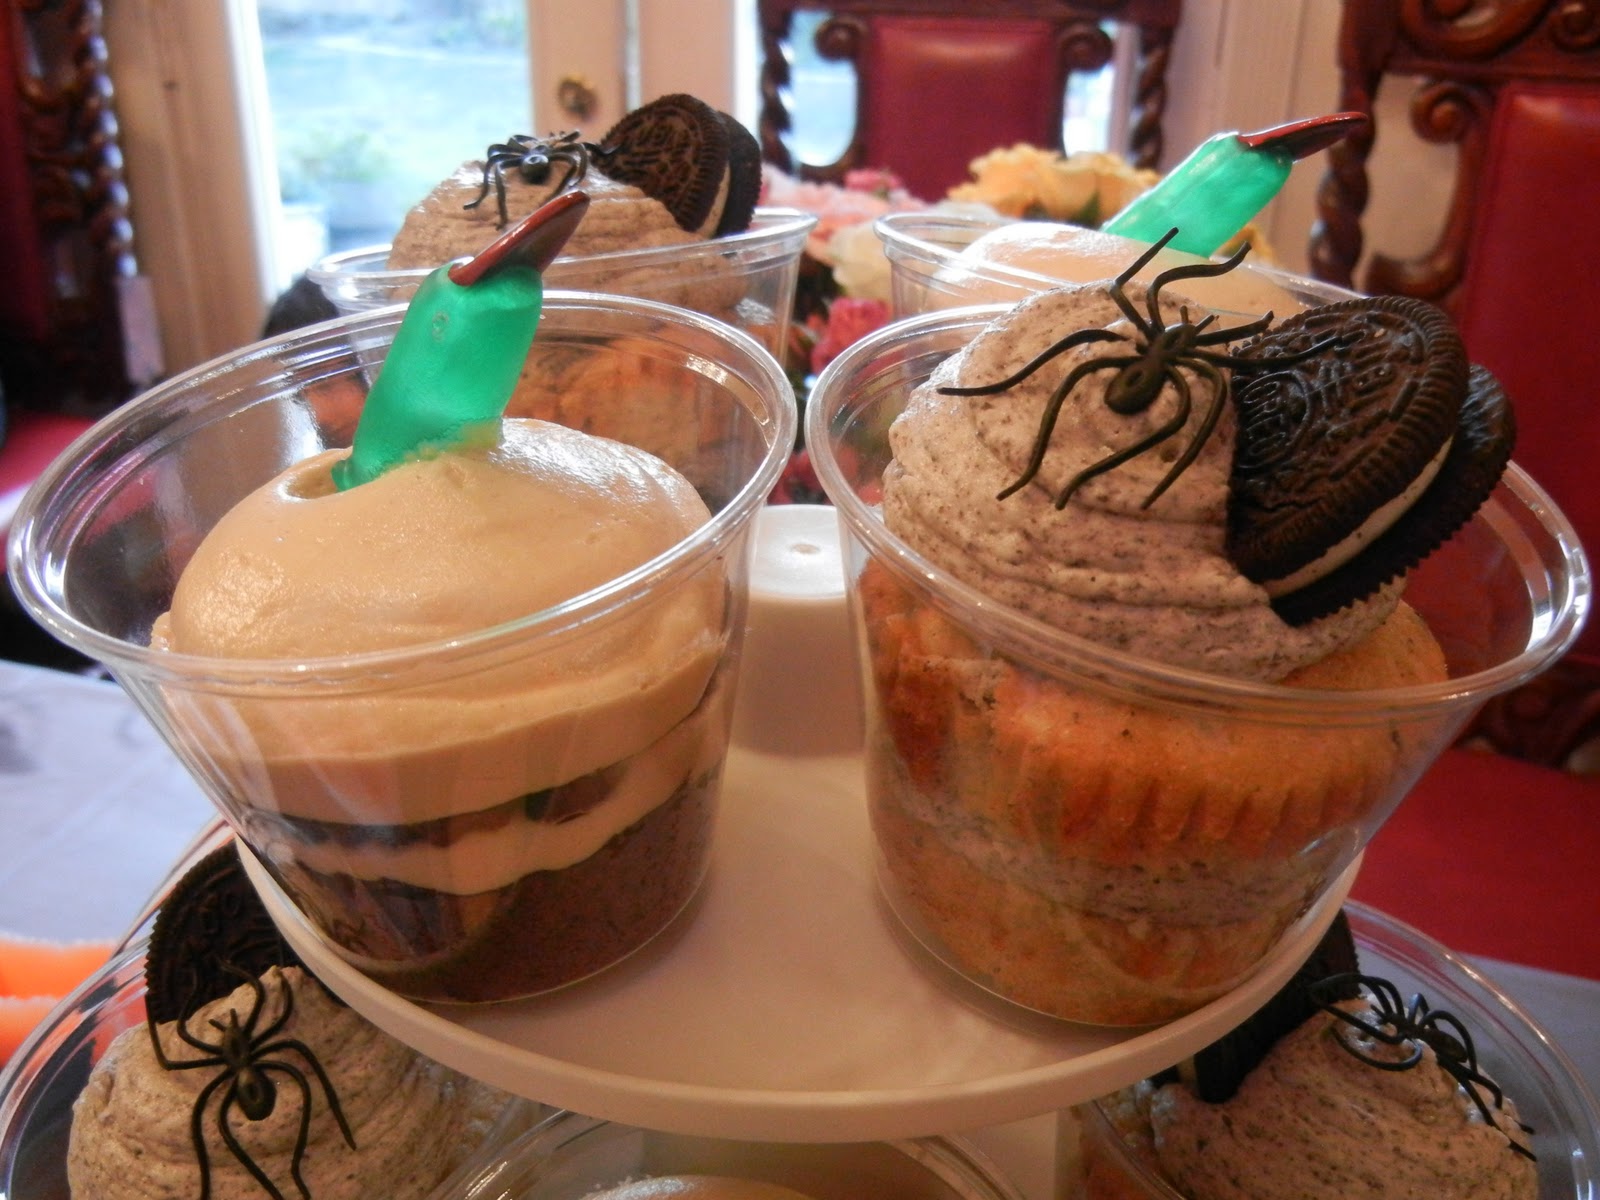
Chocolate Peanut Butterfinger Cupcakes and Cookies 'N' Scream Cupcakes

Ghoulish Pumpkin Swirled Cheesecakes


Red Velvet Cheesecake Eyepops


Of course, my sister and I were cracking jokes for two days over the eyepops. "Quit eyeing the lollipops and take the picture!" "I've got my eye on you!" I too am guilty of sending pictures of these eyepops to people along with the message, "I'm watching you!"

For the cupcakes, I wanted to do things a little differently and I put them in clear cups - a true meaning to the term "cup" cakes. For the eyepops, I bought some gauze and I made some fake blood out of cocoa powder, water and red food coloring and wrapped it around a piece of styrofoam. Hey, I like to save money where I can! All in all, the party was a success and the desserts were a hit!

Onto Halloween Day!

This year, I had the idea of making mini desserts for the parents of the trick-or-treaters, (accompanied by contact cards, of course). Ironically, while I was baking away, the episode of Friends came on when Monica makes candies for her neighbors! I'm not going to lie, this morning, I had a little anxiety as I was nervous about whether or not the desserts would be well received as a lot of parents are extra cautious on Halloween and understandably so.
I made everything bite-sized; a dessert amuse-bouche if you will.

Chocolate-Peanut Butter Cupcakes, Pumpkin Swirled Cheesecakes on a Gingersnap Crust, Chocolate Cookie Sandwiches filled with Homemade Marshmallow Fluff and Chocolate Brownies with Cream Cheese and Milk Chocolate Pieces.


To my pleasant surprise, everyone LOVED the idea! A little boy even told me, "You should do this more often!" I ran out of candy and desserts within an hour! I thought 200 pieces of candy would be enough, but I was wrong. Our neighborhood was the busiest I had ever seen it! All the kids were so cute and polite and let me tell you, GREAT for networking! They kept sending their parents my way!
 
I hope everyone had a fun and safe Halloween! Don't forget to hit up the candy sales tomorrow!

Have a great week everyone!!!

Sunday, October 16, 2011

"STRESSED" is "DESSERTS" spelled backwards.

I know, I know. I've neglected my blog but this was a chaotic week. Beyond chaotic! Not to mention, I was crazy sick with a cold. Germs were all over me like a cheap suit! I guess it didn't help that I was eating ice cream with my caramel sauce every night, but I'm back with a fresh post and some great pictures! 

My niece turned 11 and she had a huge Hawaiian themed birthday party this weekend. I was asked by my sister to make the desserts and after much whining and begging (mainly from me), Carina (my client) and I finally agreed on a dessert bar so people could have options to choose from. I also took the liberty of putting together an impromptu menu so people would know what each dessert consisted of! Of course, the menu was somehow thrown to the side but it was a good idea, in theory.


I busted out 60ish red velvet cheesecake lollipops, 3 dozen s'mores and peanut butter cupcakes, 2 batches of brownies topped with caramel (actually, 4... the first 2 batches didn't make the cut - no pun intended) and a banana cake with strawberry frosting, per the birthday girl's request. I was one tired baker! Perhaps I need an assistant. My niece's dog that is willing to "clean up" the floor when anything spills, doesn't count. Once, I dropped half a cooked chicken breast on the floor and she inhaled it before I could bend over to pick it up! She's tiny but she can eat with the best of them!

Everything went off without a hitch (almost) in spite of the million things that were being cooked and baked in the kitchen. I love watching people eat my culinary treasures while they're ooh-ing and ahh-ing and making yummy noises. That's the best! Plus, my niece and sister were beyond happy with everything! If my heart had a mouth, it would be smiling.

And now, for your stomach's viewing pleasure...


Have a great week everyone! I will be posting a new recipe within the coming days!!!

Friday, October 7, 2011

When life hands you apples, make pie!

I have another confession to make...

...I talk to my food. Is anyone really THAT surprised?  

Quite some time ago, I was compared to Anne Burrell, or as I like to call her: the female version of Guy Fieri. If you’ve ever seen her show Secrets of a Restaurant Chef on the Food Network, you will quickly notice that she refers to her mushrooms as "sexy" and quite frequently yells out sayings like, “Oh, yeah! Great things are happening in this pan!” I am guilty of the aforementioned and it’s refreshing to see that she got her own show out of it. It's like watching a recording of me, minus the bleached hair. Does opportunity knock twice or did I just miss my chance?

Being that the weather is cooling down in sunny San Diego, I was in the mood to make a pie. Is it wrong that I had plans to go out last night and I chose to stay home and bake something? To me, there's nothing better than a warm slice of pie (accompanied by a big scoop of ice cream, of course) on a crisp night. Costco makes a delicious caramel apple pie with a streusel topping so I decided to try my hand at it. Instead of a streusel topping, I went with a double crust pie. I'm all about the crust! I also did some research to see what kind of caramel apple pie recipes were out there and I was shocked to see that every recipe called for store bought caramel sauce or caramel candies. Negative. I made my own caramel!

Coming up with the filling was quite challenging as apple pies tend to be made with strong spices. Since I was adding the caramel, I didn't want the spices to overpower the taste of the caramel but I didn't want it to be too sweet so I really had to edit and re-edit my measurements. Remember: you can always add to, but you can't take away!

A few apples and dashes of cinnamon later and I was ready to put my pie in the oven. I felt like Squirt from Finding Nemo and I found myself telling my pie, "OK! We're going to have a great bake today!" There's nothing worse than spending so much time and energy on something for it to fall apart at the very end. Food for thought.

The slits in the pie serve two purposes: for the steam to escape and for you to determine when your pie is done. When making a pie with a fruit filling, it's all about the bubbles. If the filling is boiling quickly and the filling has remained inside, step away from the pie; it's not done. If you see a slow boil and the filling is oozing out like a delicious volcano, grab your oven mitts; it's done!

Now THAT'S a pie!

Friday, September 30, 2011

I have a secret...

Ready for it?!
...

I don't add any salt to my food.

:::GASP::: I know.

Don't get me wrong, I used to, but after being told by the doctor that I had high blood pressure, she strongly recommended that I reduce my sodium intake. Salt is like a religion to me but let's be honest, there is an unnecessary amount of sodium in a lot of foods out there. Everything contains sodium: bread, eggs, milk, everything! It is so difficult to find low sodium/sodium-free foods. Per the doctor's orders, I tried staying away from sodium for a couple of weeks and by the end, I felt so much better. Not only did I lose a little weight, but I didn't feel blah and sluggish. Since then, I have completely changed my way of cooking. I believe that if you use good ingredients and sprinkle in a dash of creativity, you will not miss it at all.

I know my culinary teachers would faint at the mere thought of not adding any salt to their food, but I am not one to jump on the bandwagon. I think it's time to throw a new and refreshing idea out there! Cooking with no added salt doesn't mean completely staying away from salty foods, but limit their use and get creative. This takes me back to my Girl Scout days. If I remember correctly, one of the Girl Scout commandments is: "use your resources wisely."

To be honest, the thing I was having the hardest time not adding salt to was my guacamole. Guacamole NEEDS that salty bite to break up the buttery avocado. Therefore, I had the idea of adding blue cheese crumbles to it resulting in the perfect marriage. Why am I so obsessed with marrying things? I must have been a Jewish grandmother in my past life.

I did a little research and 1/4 tsp of Morton's Kosher Salt contains about 480 mg of sodium. Realistically, you're going to use more than that when making guacamole; probably closer to 1 tbsp. That's over 1900 mg of sodium! Substitute the salt with a 1/4 cup (roughly 2 oz) of blue cheese crumbles and you have just drastically cut your salt intake. I use the Wisconsin blue cheese crumbles from Sprout's and each oz contains 390 mg of sodium.

This guacamole recipe is very close to my heart. It has been there with me through many a taco night. I hope you enjoy it as much as I do!

Guacamole with Roasted Corn and Blue Cheese Crumbles


Yield 6-8 servings

Ingredients

1 ear of corn
1 tomato
1/2 an onion
10-12 sprigs of cilantro
5 ripe Hass avocados
Juice of 1 lemon
1/4 cup of blue cheese crumbles*
Red pepper flakes TT (optional)

Directions

Start out by removing the kernels from the cob and throwing them in a skillet. Pan-roast the kernels on medium heat for about 10 minutes, stirring 2-3 times max. Remove from stove top and set aside to cool.

Clean and dice your tomato. Don't forget to remove the seeds. Toss diced tomatoes in a large bowl.

Dice your onion. I'm not one for the taste of raw onions so I like to soften the intensity of the bite by submerging my diced onions in some water for a few minutes (if you like the taste of raw onions, throw them in with your tomato as is). After about 10 minutes, strain them and toss them in your bowl.

Twist the sprigs of cilantro tightly and rough chop them. You don't want to chop the cilantro too finely or else it will come out looking like mush. Cut everything, including the stems and put them in the bowl.

Slice the avocados in half, remove the seed and with a large spoon, scoop out the avocado and put them in the bowl.

Squeeze lemon juice over everything: tomatoes, onions, cilantro and avocados.

At the point, you can either take a hand blender and blend everything together or you can mash it with a potato masher. I like my guacamole to be both chunky and smooth, but you can choose to have whatever texture you want. Once you have reached your desired consistency, fold in the corn and blue cheese crumbles*. For some heat, you can add in some red pepper flakes TT.

*If you are not a fan of blue cheese, you can substitute shredded Monterrey Jack, Oaxaca, Cotija cheese or just omit the cheese altogether... but that's just crazy talk!

Serve with tortilla chips, veggies, warm tortillas... the guacabilities are endless!

Thursday, September 29, 2011

1st post and a 1st birthday!

My friend Jen gave birth to a beautiful little girl named Maya. That was a year ago and the little nugget of joy just turned one! I was given the honor of being hired for her birthday and was asked to create four dozen cupcakes (flavors of MY choosing) and her smash cake! For those of you that don’t know what a smash cake is, it is a miniature cake made for the child to… well, smash!

From the second I was hired for said gig, I had been texting Jen non-stop about different flavors we should go with. She had only one request: the smash cake MUST be in the shape of a turtle. I had a total Steel Magnolias moment and wondered how morbid it would be to make the cake out of red velvet to creep the kids out as Maya hacked and ate away at it. But of course, I would NEVER do such a thing! I opted for rainbow colors instead!

Being a September birthday party outdoors, of course I was worried about the heat and whether or not the buttercream would hold up. I thought about making the smash cake from marshmallow fondant but I didn't want Maya to have trouble eating it, so I decided an all-buttercream cake was the way to go! After a couple of emotional breakdowns, I'm happy to say the cake was a complete success. Maya happily ripped the leg off and nibbled away! Poor turtle didn't stand a chance.


Now, for the cupcakes. After much deliberation, we decided on the following flavors: red velvet with cream cheese frosting, chocolate with Callebaut chocolate buttercream, banana with caramel buttercream and vanilla with vanilla bean buttercream... and sprinkles!


Tips for the perfect buttercream!

A tbsp or 2 of cream goes a long way. Whip it in at the end if your buttercream is too sweet, too stiff, or you just want to make it fluffy and creamy. It will work wonders and will spread/pipe nicely.

Sift your powdered sugar! If not, it will clump up quite easily. Once you have lumps in your buttercream, you will have a very difficult time trying to get them out.

1 to 2 sticks of unsalted butter should be the norm for buttercream. I have come across some recipes which call for up to a pound (4 sticks) of butter. In my opinion, it ends up tasting like whipped butter.

Stay away from buttercream "fillers" like shortening. It will produce a heavy and greasy buttercream. Keep it simple.

If you are going to be on a time crunch, you can make your buttercream ahead of time and store it in the fridge but don't forget to rewhip it before putting it to use.